Git Workflow: Difference between revisions
| (One intermediate revision by the same user not shown) | |||
| Line 8: | Line 8: | ||
We will assume here that you have a clone of the OpenClonk repository like the one | We will assume here that you have a clone of the OpenClonk repository like the one | ||
you created if you followed the [[Building_with_Windows|Windows build tutorial]]. | you created if you followed the [[Building_with_Windows|Windows build tutorial]]. If you haven't, just follow the tutorial and return here after you have finished the "Clone" section. | ||
The screenshots and explanations will also be somewhat specific to TortoiseGit. | The screenshots and explanations will also be somewhat specific to TortoiseGit. | ||
On the other hand, the workflow is equally viable no matter what Git interface you use. | On the other hand, the workflow is equally viable no matter what Git interface you use. | ||
| Line 130: | Line 130: | ||
[[File:ghc_work_patch1.png]] | [[File:ghc_work_patch1.png]] | ||
Make sure | Make sure to select "FETCH_HEAD" in the "Since" field in order to get all patches that are | ||
new relative to the OpenClonk repository. Otherwise, TortoiseGit can use pretty nonsensical defaults | new relative to the OpenClonk repository. Otherwise, TortoiseGit can use pretty nonsensical defaults | ||
and produce thousands of useless patches as a result. | and produce thousands of useless patches as a result. | ||
Latest revision as of 10:28, 2 December 2012
As an open source project, we want to make it easy for a lot of people to work on our code - even people that aren't directly involved in the project! That's why we use a distributed version control system called Git, which makes sure that all files stay consistent and it's not too easy to lose your data when things get complicated. This article will walk you through how you can use this system to organize and submit your changes to OpenClonk.
We will assume here that you have a clone of the OpenClonk repository like the one you created if you followed the Windows build tutorial. If you haven't, just follow the tutorial and return here after you have finished the "Clone" section. The screenshots and explanations will also be somewhat specific to TortoiseGit. On the other hand, the workflow is equally viable no matter what Git interface you use.
Committing your Changes
The first step is to actually make some meaningful changes to OpenClonk. TortoiseGit will detect your work and automatically mark files or directories that have changed:
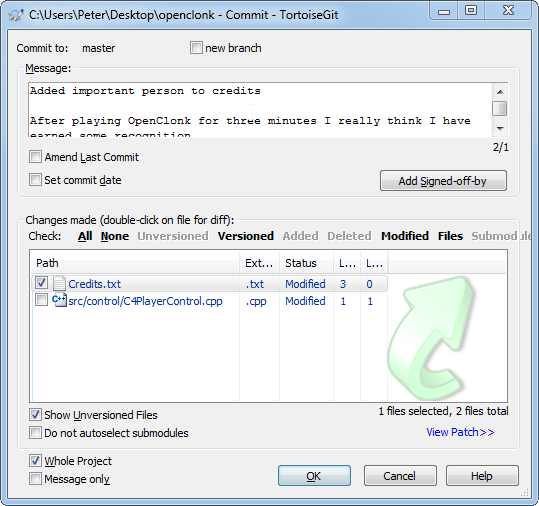
To register your changes with Git, you need to "commit" them using the "Git Commit" entry from the right-click menu. Here you can select what files you want to include in the commit, and give a message describing what you have done. Try to give a short summary of the change in the first line, followed by more details and explanations after one empty line.
It is generally a good idea to commit early, as registering changes with Git means they will be a lot harder to lose. It's a good idea to do this even if you know that you will want to do additional changes to the commit later: The commit window allows you to "amend" the last commit so you can keep working on it.
For even more flexibility, simply create another commit for additional changes and "squash" them later. This is also a good idea because it allows you to go back and forth between revisions until you are convinced that your change works. It might even be a good idea to mark commits that you want to be merged with a marker like "[squash!]" so you don't forget to merge the changes later on.
Synchronizing your Repository
OpenClonk is under constant development, and it's generally a good idea to stay up-to-date. Maybe uninuitively, this is especially vital if you are thinking of submitting a change: You need to make sure that your changes work with where development is currently at.
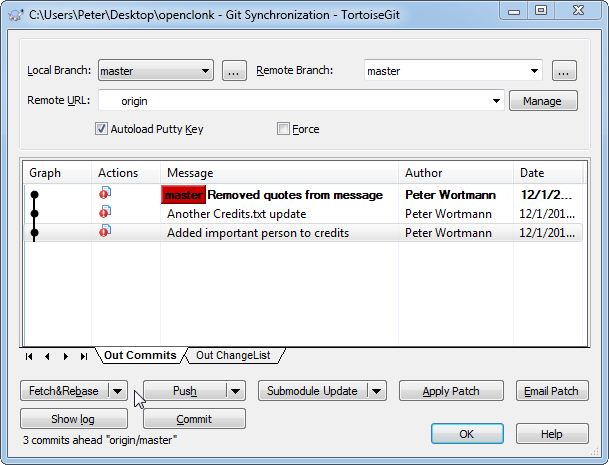
Use the "Git Sync..." context menu entry to see something like the following dialog:
There are a number of ways you can synchronize your repository: The default one will be "Pull", which is okay as long as you don't have any changes of your own. As the screenshot shows that we actually have some changes, we want to use "Fetch&Rebase". This will cause Git to download the changes and then start a "rebase", which we will explain in the next section.
Rebasing your Changes
The main idea with rebasing is to update your changes so they apply cleanly to the current state of the repository. This is important, as some parallel changes might have conflicted with what you have done.
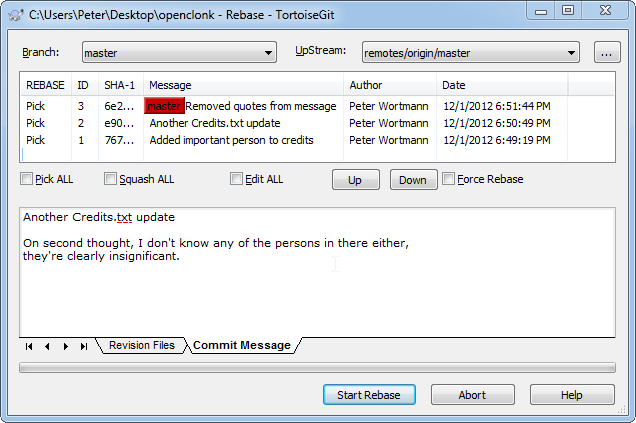
The rebase window will come up automatically if you chose "Fetch&Rebase" in the last step, but you can reach it manually using the "Rebase..." entry in the TortoiseGit right-click menu. It should look like follows:
What is happening here? The idea of a rebase is simple: The listed changes have been done to an out-of-date repository, therefore they need to be updated for the new state of the OpenClonk repository. To do this, Git will first temporarily (!) remove your changes, then check out the new repository state, and finally try to "replay" the changes in the list. Pressing "Start Rebasing" starts this process, resulting in all your commits getting updated - unless conflicts happen, which we will explain below.
Reorganizing Changes
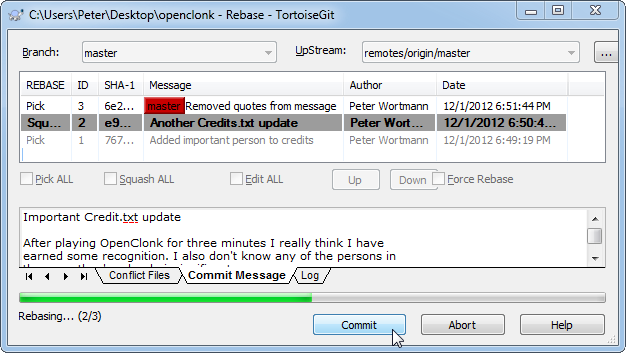
Before we get to conflicts though, note that the rebase window allows you to reorder, edit and "squash" (merge) changes. This is Git's workflow philosophy - as rebasing means re-applying all your changes, it might as well allow you to change and reorder them while we're at it. Let's say we want to merge the two commits for Credits.txt. We do this by making sure that the commits appear directly after each other in the list, then change the "REBASE" state to "Sqash" for the later commit (look at the ID if unsure):
When we select "Start Rebasing" now, rebasing will actually suspend after the first two commits so we can edit the message for the merged commit. By default Git will just append the two original messages, which we most likely want to change:
Notice that in the list the first commit is grayed out now to signify that it has already been converted at this point, and the second commit is bold as we are currently considering how to re-record it. When you're finished, press "Commit" to continue and eventually finish rebasing.
Conflicts and Editing
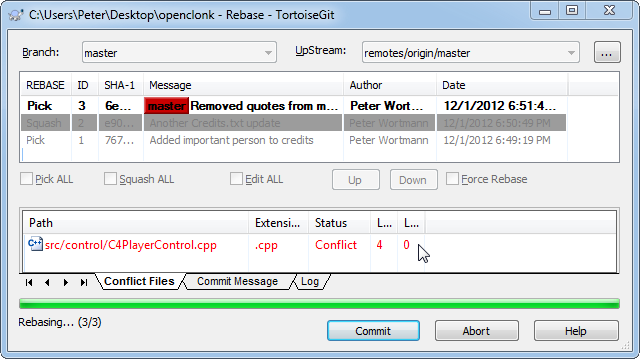
Git is pretty smart about making sense of your changes even if the repository has changed. Sometimes, though, it will still run into a problem where it has to request your help in figuring out what to do:
Here Git has encountered a conflict while trying to apply the bold change, in the file marked in red. If we open the file, we might find something like follows:
   <<<<<<< HEAD
                   LogF("WARNING: Control %s of set %s contains undefined key \"%s\".", GetControlName(), pParentSet->GetName(), szKeyName);
   #endif
   =======
                   LogF("WARNING: Control %s of set %s contains undefined key %s.", GetControlName(), pParentSet->GetName(), szKeyName);
   >>>>>>> 6e29e01... Removed quotes from message
This is telling us that while our commit (6e29e01) changed these lines to something, the OpenClonk repository (HEAD) changed them to something else. To resolve this, we update all conflicted files to the correct state, mark the files as "Resolved" (using the right-click menu) and finally press "Commit" in order to accept the resolution.
Submitting your Change
After you have rebased your changes to the current state of the OpenClonk repository (important!) you can attempt to submit your changes. How you do this depends on whether you are an OpenClonk team member or not: You either have to submit a patch, or can push the OpenClonk repository directly. We will explain both methods here.
Creating a Patch
In order to get a commit into the repository as a non-team member, you will have to send the change to somebody that can review and accept it, for example by posting it in the forum. The first step is to package your change as a patch file.
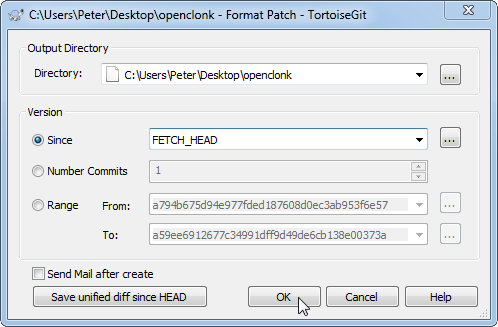
To do this, use the "Create Patch Serial..." or "Format Patch" option from the right-click menu (it's the same thing, just named differently depending on where you are). You should get the following window:
Make sure to select "FETCH_HEAD" in the "Since" field in order to get all patches that are new relative to the OpenClonk repository. Otherwise, TortoiseGit can use pretty nonsensical defaults and produce thousands of useless patches as a result. Select a convenient directory for the patches to go into, and select "OK" to get the ball rolling.
Afterwards, you should see all your changes as conveniently-named patch files in the directory you have chosen:
You can send this to an OpenClonk team member - or anybody with an OpenClonk repository clone, really - and they will be able to import your change. If they tell you that the patch doesn't apply cleanly, this probably means that you have to synchronize and rebase again (see previous section).
Pushing Changes
Pushing a change directly is slightly easier - all you have to do is select "Push" from the synchronization window. What can happen here is that you get a message of the form:
   Pushing to ssh://git@git.openclonk.org/openclonk.git
   To ssh://git@git.openclonk.org/openclonk.git
   ! [rejected]        master -> master (non-fast-forward)
   error: failed to push some refs to 'ssh://git@git.openclonk.org/openclonk.git'
   hint: Updates were rejected because the tip of your current branch is behind
   hint: its remote counterpart. Merge the remote changes (e.g. 'git pull')
   hint: before pushing again.
This helpful message tells you that you have forgotten to synchronize & rebase before trying to push. Better get used to it :-)


