Building with Windows: Difference between revisions
No edit summary |
new clone screenshot! |
||
| (36 intermediate revisions by 9 users not shown) | |||
| Line 1: | Line 1: | ||
[[DE:Kompilieren unter Windows|German Version here]] | |||
= Get the sources = | = Get the sources = | ||
The source of OpenClonk is hold in a so-called version control system. Put simply, this is something that allows programmers to coordinate their work. For the moment, it's just a couple of files you want to download. | The source of OpenClonk is hold in a so-called version control system. Put simply, this is something that allows programmers to coordinate their work - if you want, you can afterwards read [[Git Workflow|the Git article]] to see how that works. For the moment, it's just a couple of files you want to download. | ||
== Install | == Install TortoiseGit == | ||
The notable difference to a simple download is that you need a special program to do it. Our version control system is | The notable difference to a simple download is that you need a special program to do it. Our version control system is Git, and we will use the [https://tortoisegit.org/ TortoiseGit] client. Follow that link and click "Download". | ||
[[File:build_windows_tgit.png|860px]] | |||
Proceed to the "Download" page and select the appropriate installer. If unsure, you probably want the 64-bit version: | |||
[[File:build_windows_tgit2.png|860px]] | |||
And walk through the installation. Just selecting the default options should get you through. | |||
[ | ''OpenClonk team members:'' If you want to use [http://www.chiark.greenend.org.uk/~sgtatham/putty/download.html PuTTY] to push commits, make sure to select the appropriate option along the way. Do it again for the msysGit installation below. | ||
[[File:build_windows_tgit4.png]] | |||
You also need to install [https://git-for-windows.github.io/ Git for Windows], which is what actually does all the work behind the scenes. Following this link will get you to another download page: | |||
[[File: | [[File:build_windows_tgit3.png|860px]] | ||
This installation will ask even more confusing questions. But again default options won't cause anything to break, I would just recommend deactivating some GUI options, as TortoiseGit already offers them: | |||
[[File:build_windows_tgit5.png]] | |||
After a bit of waiting and (if you're lucky) not a single request to restart your computer, this should have given you a working TortoiseGit installation. | |||
== Clone == | |||
Okay, now we are going to download the sources. Git calls this "cloning" because it's actually a lot more than just the sources. After you're done, you can check the [[Git Workflow]] page for how to work with your clone. | |||
For now, just find a place where you want the source to be, open the context menu by right-click and select "Git Clone..." from the TortoiseGit menu: | |||
[[File: | [[File:build_windows_tgit6.png]] | ||
A dialog will appear asking for the repository URL and the destination path. In our case, we want the source to be the OpenClonk repository. The URL you need is normally "https://github.com/openclonk/openclonk". Here's how it should look like: | |||
''OpenClonk team members:'' Use "git@github.com:openclonk/openclonk" instead and activate the option to auto-load the PuTTY key for maximum convenience. | |||
[[File: | [[File:build_windows_tgit_pub.png]] | ||
Congratulations, you now have the bleeding edge of OpenClonk development on your hard drive! | After pressing "OK", TortoiseGit will work for a while. After watching a progress bar for a while, it should finish. Congratulations, you now have the bleeding edge of OpenClonk development on your hard drive! | ||
[[File: | [[File:build_windows_tgit_finish.png|860px]] | ||
There is a lot of stuff and most likely you won't understand much of it. Here's a quick orientation guide of the actually important bits: | |||
* "docs" - the sources of our [http://docs.openclonk.org/en/sdk/ documentation] | |||
* "docs" - the sources of | * "planet" - these are the game resources - scripts, graphics and everything to explain how to make a game out of them | ||
* "planet" - game resources | * "src" - all the source code of the game engine. Lots of C++ ahead. | ||
* "src" - the source code of the engine | |||
= Get it to Compile = | = Get it to Compile = | ||
This is nice, but we are interested in seeing the game run, aren't we? For this, we need a program that will take all those C++ files and make an executable file out of it. | This is nice, but we are interested in seeing the game run, aren't we? For this, we need a program that will take all those C++ files and make an executable file out of it. Unfortunately, programming is complicated stuff so even setting up the tools and the environment has become a bit of science. But this won't stop us. | ||
== Get Microsoft Visual Studio == | == Get Microsoft Visual Studio == | ||
You can say what you want about Microsoft, but they sure make nice development environments. And they are even giving a lot of it away for free. We will use [ | You can say what you want about Microsoft, but they sure make nice development environments. And they are even giving a lot of it away for free. We will use [https://www.visualstudio.com/downloads/download-visual-studio-vs# Visual Studio 2015 Express for Desktop]. Follow that link, then click on "Visual Studio 2015" and "Express 2015 for Desktop": | ||
[[File:Build_windows_msvc2015.png|860px|Make extra sure you got the "Express 2015 for Desktop.]] | |||
Run it, accept the licensing terms, click the big "Install" link and accept the UAC prompt. Then go make a coffee because the install will probably take a while. | |||
== Get Dependencies == | == Get Dependencies == | ||
| Line 76: | Line 72: | ||
Like most big programs, OpenClonk doesn't stand on its own. Some things (like opening PNG images) were already programmed by other programers far better than we could ever do. This is why we have to get a few so-called "libraries" before Clonk can be built. | Like most big programs, OpenClonk doesn't stand on its own. Some things (like opening PNG images) were already programmed by other programers far better than we could ever do. This is why we have to get a few so-called "libraries" before Clonk can be built. | ||
You could try to | You could expend some effort try to find, download, and compile all those libraries by yourself, but that would take quite some time. Instead, just download one of the packages we've provided for your convenience: | ||
* [http://people.ds.cam.ac.uk/pw410/out/openclonk-deps-vs140-i386-easy.7z the x86 package] (we'll assume this one) | |||
* [http://people.ds.cam.ac.uk/pw410/out/openclonk-deps-vs140-amd64-easy2.7z the amd64 package] | |||
These packages are made for unpacking directly into the "openclonk" folder you created above, which will put a couple of DLL files into the root and create a "deps" folder. If you would like to organise the dependencies yourself, use the original dependency files provided by Isilkor ([https://www.nosebud.de/~nh/openclonk/openclonk-deps-vs140-i386.7z x86] and [https://www.nosebud.de/~nh/openclonk/openclonk-deps-vs140-amd64.7z amd64]). | |||
== Get CMake == | == Get CMake == | ||
| Line 91: | Line 87: | ||
What we need is [http://www.cmake.org/cmake/resources/software.html#latest CMake]. Follow that link and download the installer: | What we need is [http://www.cmake.org/cmake/resources/software.html#latest CMake]. Follow that link and download the installer: | ||
[[File:build_windows_cmake1.png]] | [[File:build_windows_cmake1.png|860px]] | ||
| Line 99: | Line 95: | ||
After the installation, start the CMake GUI from the start menu. | After the installation, start the CMake GUI from the start menu. Put the path you cloned the repository into the source code path field. | ||
You can set the build path to any directory you want, but it is important that the "deps" folder from the last step is also in that directory. | |||
[[File:build_windows_cmake3.png]] | [[File:build_windows_cmake3.png]] | ||
Now click the "Configure" button in the lower left. It will ask what compiler we want to use. Select "Visual Studio | Now click the "Configure" button in the lower left. It will ask what compiler we want to use. Select the compiler you want to use; either "Visual Studio 14 2015" if you downloaded the x86-bit library package above, or "Visual Studio 14 2015 Win64" if you got the amd64-bit package. | ||
[[File:build_windows_cmake4.png]] | [[File:build_windows_cmake4.png]] | ||
If you get some error messages (in red), you're probably missing some dependencies. Don't worry if cmake complains about some missing paths, it shouldn't affect you. | |||
The last step is to click the "Generate" button. | |||
== Your First Build == | == Your First Build == | ||
Okay, now we have everything needed to make OpenClonk run for the first time. Go into the | Okay, now we have everything needed to make OpenClonk run for the first time. Go into the source directory and double-click on the "openclonk.sln" file that should now have appeared: | ||
[[File:build_windows_build1.png]] | [[File:build_windows_build1.png|860px]] | ||
Visual C++ should open and look similar to this: | Visual C++ should open and look similar to this: | ||
[[File:build_windows_build2.png]] | [[File:build_windows_build2.png|860px]] | ||
We only want to build the engine, so select " | We only want to build the engine, so select "openclonk" from the list, right-click and select "Set as Start-Up project". | ||
[[File:build_windows_build3.png]] | [[File:build_windows_build3.png]] | ||
Now press F5 (or, if you prefer, click the "Local Windows Debugger" button in the tool bar). Visual Studio will notice that you don't actually have a current compiled version of OpenClonk yet. Tell it to build one, and if you like also tell it to always just automatically build a new version using the check box. | |||
[[File:build_windows_outofdate.png]] | |||
[[File: | |||
If all goes well, after a couple of minutes you'll be looking at the OpenClonk main menu. | |||
[[File:Openclonk_first_start.jpg]] | |||
In case you are wondering why OpenClonk suddenly starts in some kind of pseudo windowed mode: This is because we just built a debug build (note the "dbg" after the version?). This build is a bit slower but allows you to get a better look at the internals of the engine while it's running. Maybe we'll have another article about that soon. | |||
Latest revision as of 17:13, 13 May 2018
Get the sources
The source of OpenClonk is hold in a so-called version control system. Put simply, this is something that allows programmers to coordinate their work - if you want, you can afterwards read the Git article to see how that works. For the moment, it's just a couple of files you want to download.
Install TortoiseGit
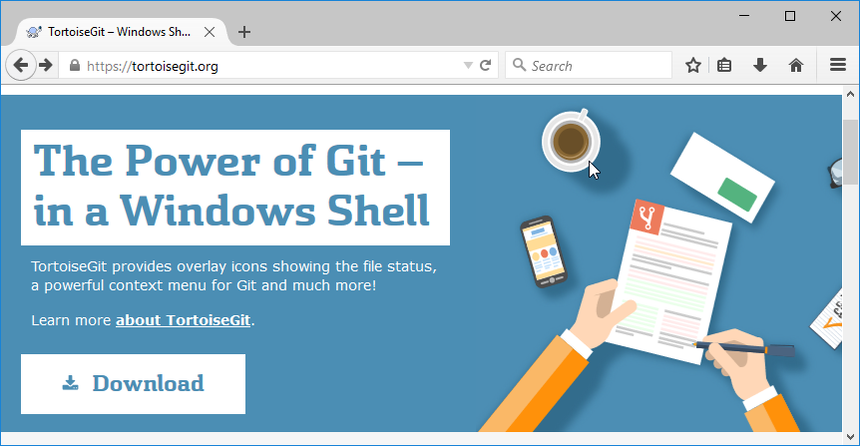
The notable difference to a simple download is that you need a special program to do it. Our version control system is Git, and we will use the TortoiseGit client. Follow that link and click "Download".
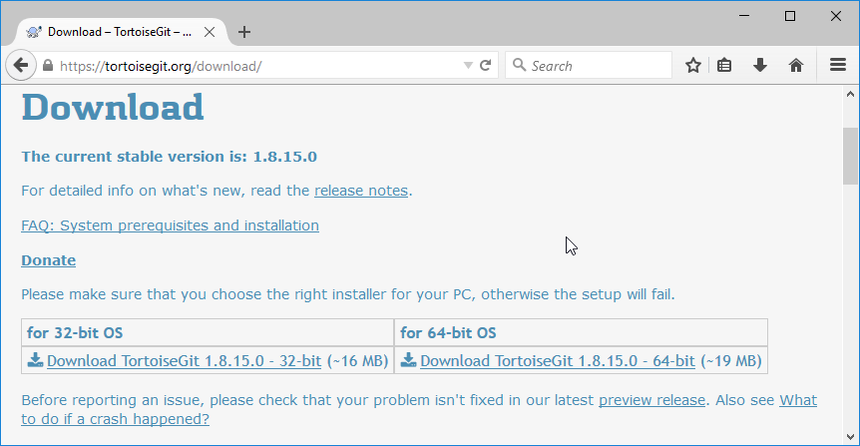
Proceed to the "Download" page and select the appropriate installer. If unsure, you probably want the 64-bit version:
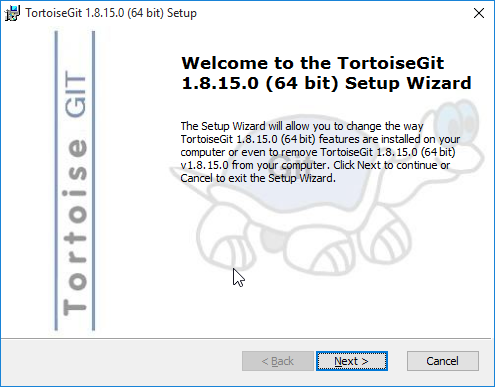
And walk through the installation. Just selecting the default options should get you through.
OpenClonk team members: If you want to use PuTTY to push commits, make sure to select the appropriate option along the way. Do it again for the msysGit installation below.
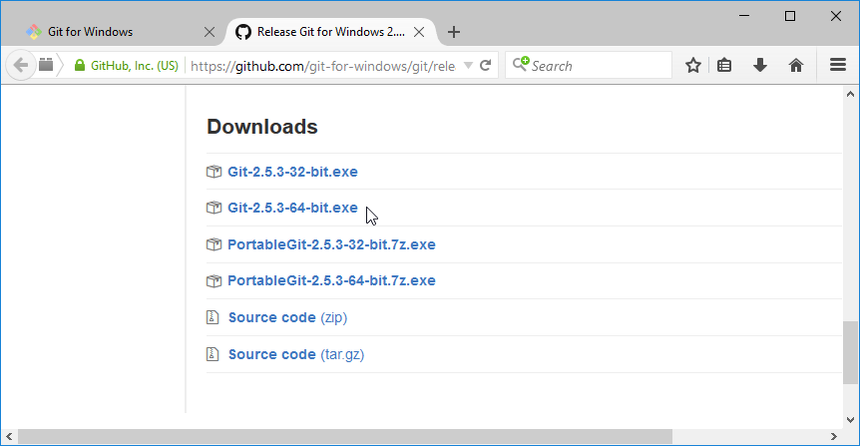
You also need to install Git for Windows, which is what actually does all the work behind the scenes. Following this link will get you to another download page:
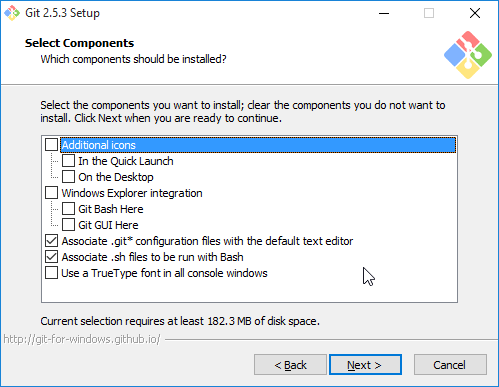
This installation will ask even more confusing questions. But again default options won't cause anything to break, I would just recommend deactivating some GUI options, as TortoiseGit already offers them:
After a bit of waiting and (if you're lucky) not a single request to restart your computer, this should have given you a working TortoiseGit installation.
Clone
Okay, now we are going to download the sources. Git calls this "cloning" because it's actually a lot more than just the sources. After you're done, you can check the Git Workflow page for how to work with your clone.
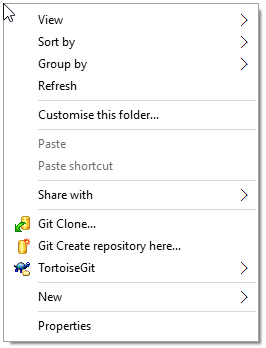
For now, just find a place where you want the source to be, open the context menu by right-click and select "Git Clone..." from the TortoiseGit menu:
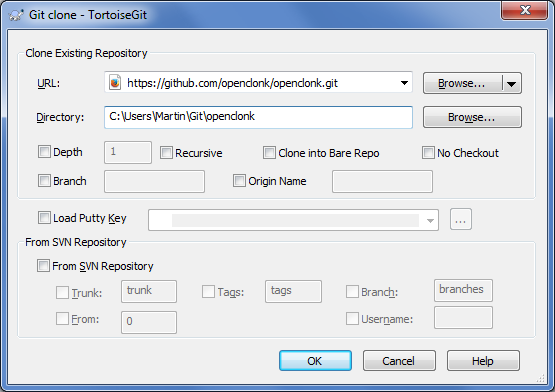
A dialog will appear asking for the repository URL and the destination path. In our case, we want the source to be the OpenClonk repository. The URL you need is normally "https://github.com/openclonk/openclonk". Here's how it should look like:
OpenClonk team members: Use "git@github.com:openclonk/openclonk" instead and activate the option to auto-load the PuTTY key for maximum convenience.
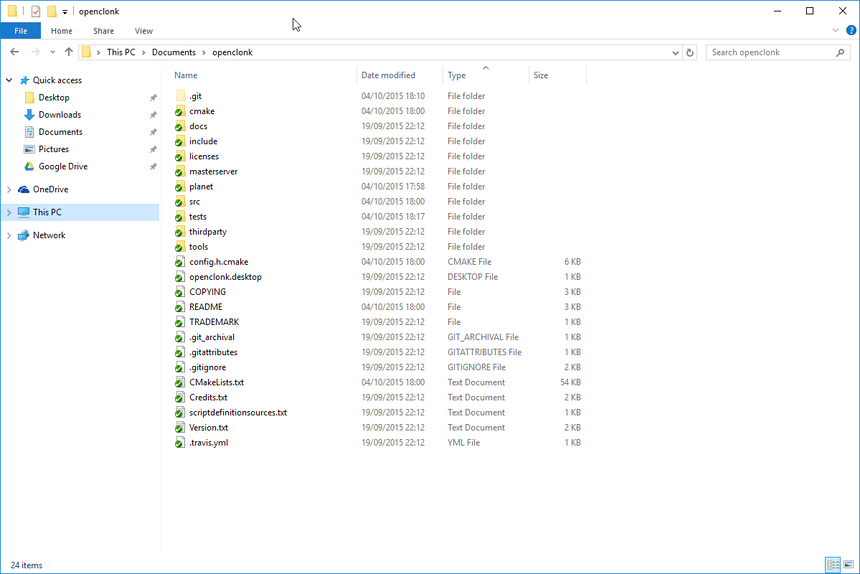
After pressing "OK", TortoiseGit will work for a while. After watching a progress bar for a while, it should finish. Congratulations, you now have the bleeding edge of OpenClonk development on your hard drive!
There is a lot of stuff and most likely you won't understand much of it. Here's a quick orientation guide of the actually important bits:
- "docs" - the sources of our documentation
- "planet" - these are the game resources - scripts, graphics and everything to explain how to make a game out of them
- "src" - all the source code of the game engine. Lots of C++ ahead.
Get it to Compile
This is nice, but we are interested in seeing the game run, aren't we? For this, we need a program that will take all those C++ files and make an executable file out of it. Unfortunately, programming is complicated stuff so even setting up the tools and the environment has become a bit of science. But this won't stop us.
Get Microsoft Visual Studio
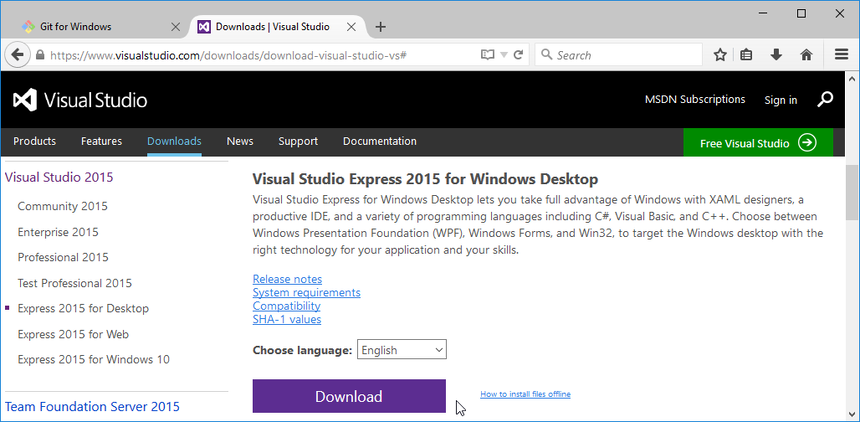
You can say what you want about Microsoft, but they sure make nice development environments. And they are even giving a lot of it away for free. We will use Visual Studio 2015 Express for Desktop. Follow that link, then click on "Visual Studio 2015" and "Express 2015 for Desktop":
Run it, accept the licensing terms, click the big "Install" link and accept the UAC prompt. Then go make a coffee because the install will probably take a while.
Get Dependencies
Like most big programs, OpenClonk doesn't stand on its own. Some things (like opening PNG images) were already programmed by other programers far better than we could ever do. This is why we have to get a few so-called "libraries" before Clonk can be built.
You could expend some effort try to find, download, and compile all those libraries by yourself, but that would take quite some time. Instead, just download one of the packages we've provided for your convenience:
- the x86 package (we'll assume this one)
- the amd64 package
These packages are made for unpacking directly into the "openclonk" folder you created above, which will put a couple of DLL files into the root and create a "deps" folder. If you would like to organise the dependencies yourself, use the original dependency files provided by Isilkor (x86 and amd64).
Get CMake
Before all this becomes useful, we still need something that tells the compiler how all those sources and libraries should be compiled together.
For this, Visual C++ needs a project file. But there is none - we have to consult another program to generate it for us. This might seem confusing - but the point is that there are a lot of build environments besides Visual Studio, and having all those project files next to each other would become a problem in the long run.
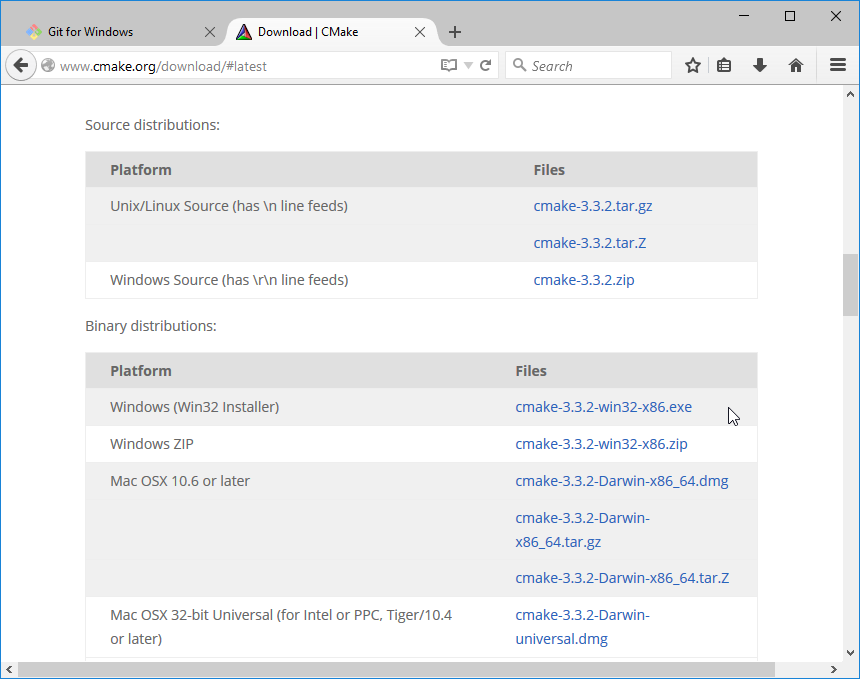
What we need is CMake. Follow that link and download the installer:
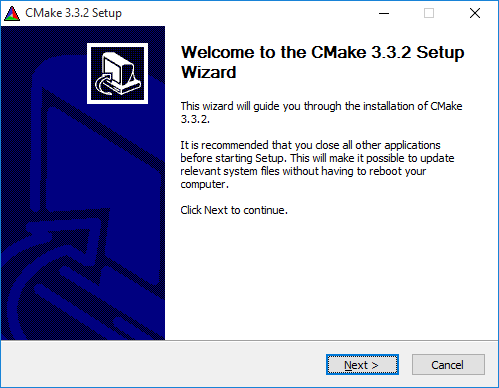
You know what to do.
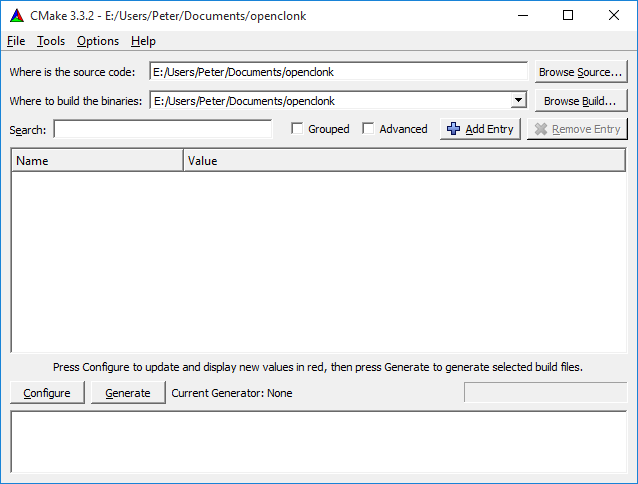
After the installation, start the CMake GUI from the start menu. Put the path you cloned the repository into the source code path field.
You can set the build path to any directory you want, but it is important that the "deps" folder from the last step is also in that directory.
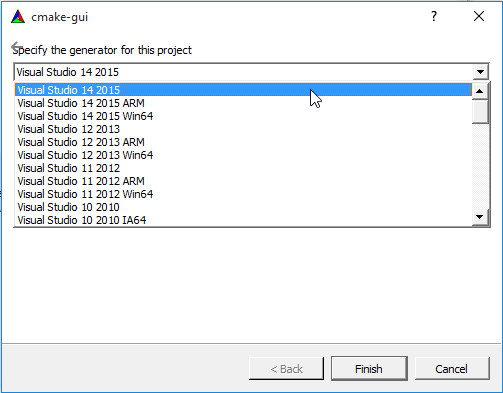
Now click the "Configure" button in the lower left. It will ask what compiler we want to use. Select the compiler you want to use; either "Visual Studio 14 2015" if you downloaded the x86-bit library package above, or "Visual Studio 14 2015 Win64" if you got the amd64-bit package.
If you get some error messages (in red), you're probably missing some dependencies. Don't worry if cmake complains about some missing paths, it shouldn't affect you.
The last step is to click the "Generate" button.
Your First Build
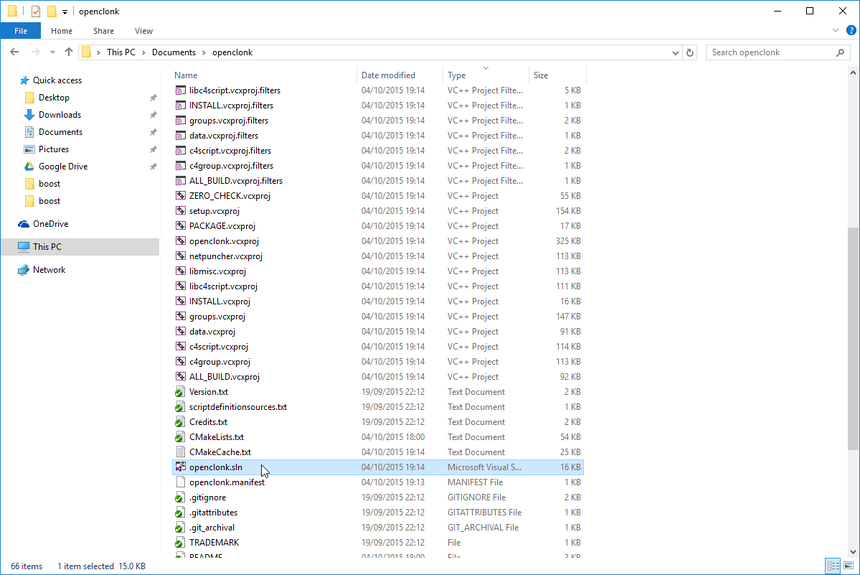
Okay, now we have everything needed to make OpenClonk run for the first time. Go into the source directory and double-click on the "openclonk.sln" file that should now have appeared:
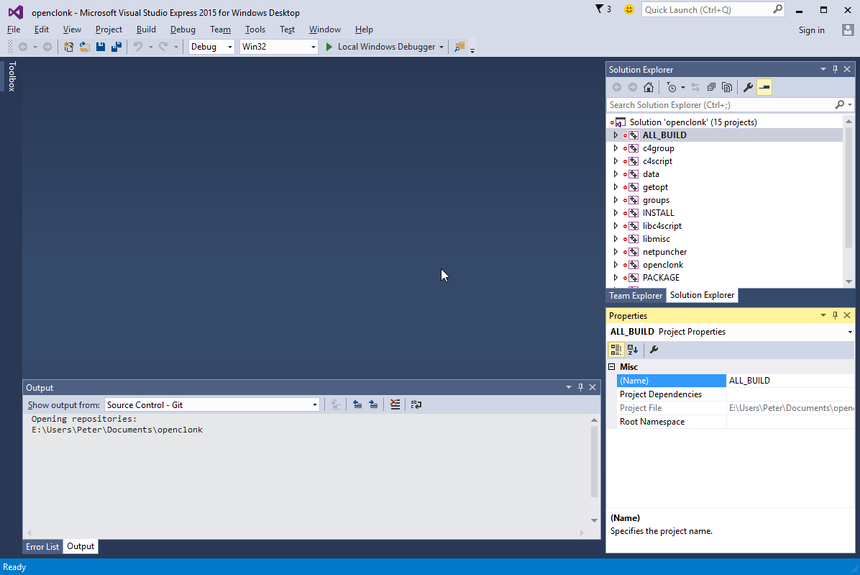
Visual C++ should open and look similar to this:
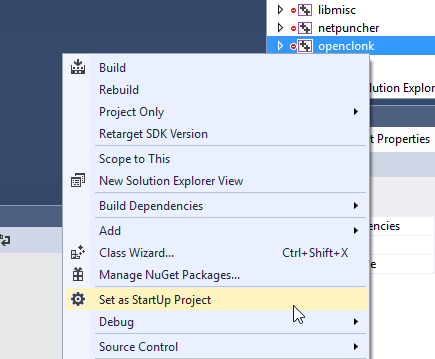
We only want to build the engine, so select "openclonk" from the list, right-click and select "Set as Start-Up project".
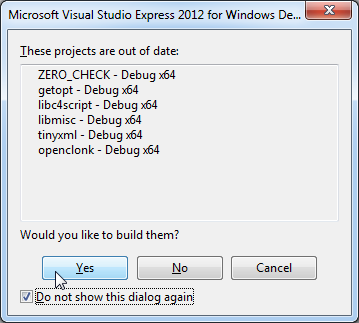
Now press F5 (or, if you prefer, click the "Local Windows Debugger" button in the tool bar). Visual Studio will notice that you don't actually have a current compiled version of OpenClonk yet. Tell it to build one, and if you like also tell it to always just automatically build a new version using the check box.
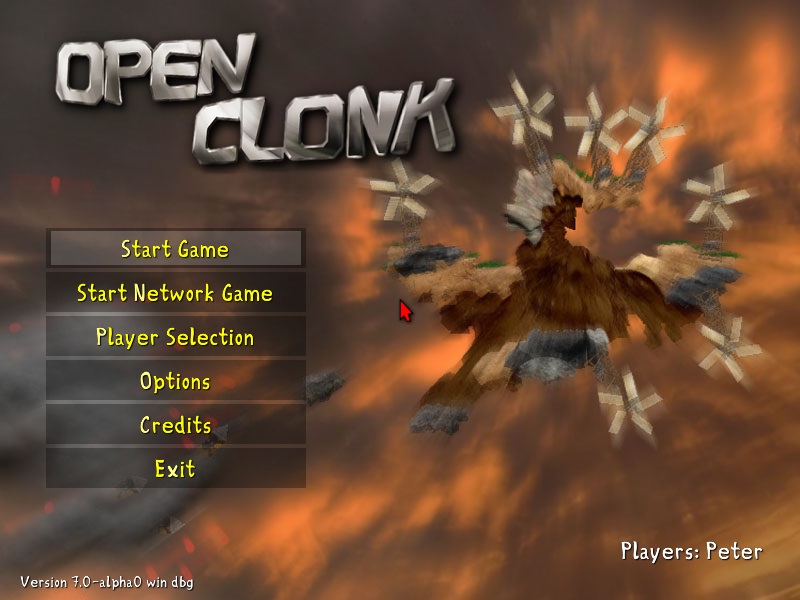
If all goes well, after a couple of minutes you'll be looking at the OpenClonk main menu.
In case you are wondering why OpenClonk suddenly starts in some kind of pseudo windowed mode: This is because we just built a debug build (note the "dbg" after the version?). This build is a bit slower but allows you to get a better look at the internals of the engine while it's running. Maybe we'll have another article about that soon.

