Scripting Documentation: Difference between revisions
| Line 40: | Line 40: | ||
</pre> | </pre> | ||
DefCores contain a fair amount of basic object data, but for now we only need to change the ID to something unique; for example: | |||
<pre width=40> | <pre width=40> | ||
[DefCore] | [DefCore] | ||
Revision as of 19:02, 5 October 2011
C4Script
C4Script is the C-like script-language used by OpenClonk. C4Script controls in-game objects; from the Clonk to the GUI, everything is programmed with C4Script.
The C4Script Reference Library is an online resource containing documentation of nearly all C4Script functions, as well as information on syntax and how to use many different features of the language.
As a side note, the name 'C4Script' comes from the first game it was used in, Clonk 4. Each following game in the series has vastly expanded on and improved the language since it's inception.
An Introduction to C4Script
Learning a new script language can be difficult, especially if you do not have any previous programming knowledge. This introduction will appeal to these users, as we do not expect any new developer to have a firm basis in C before starting. ;-)
Creating your First Object
Here we will cover the basic steps on creating a new object usable within OpenClonk.
Because creating each new object from scratch would be tedious, repetitive work, we provide a template object to work with.
Step 1
Copy the template into the root directory of OpenClonk (the folder containing your game executable), and rename it to something such as 'MyObject.ocd'. Now have a look inside your object's folder. There are a few things we'll need to change before it will load as your object, instead of over-riding the template.
The DefCore
Open the DefCore.txt file. You'll see something similar to this:
[DefCore]
id=TemplateObject
Version=4,10,0,0
Category=C4D_Object
Width=8
Height=8
Offset=-4,-4
Vertices=3
VertexX=0,2,-2
VertexY=1,-1,-1
VertexFriction=20,20,20
Value=1
Mass=10
Components=Rock=1;Wood=1;
Rotate=1
DefCores contain a fair amount of basic object data, but for now we only need to change the ID to something unique; for example:
[DefCore]
id=MyObject
Version=4,10,0,0
...etc.
Everything else in the DefCore is fine for our purposes, so let's have a look at the script.
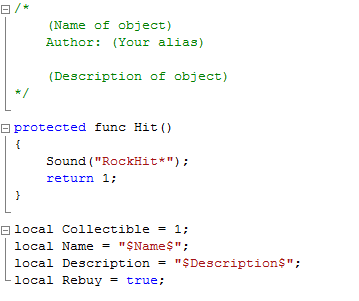
The Script File

The script file contains the object's 'code', or the 'programming' of the object. This is the real meat of custom objects.
If you use Windows, to edit Script files in a more user-friendly way it is suggested you use a program such as Notepad++ instead of the default text editor.
Have a look at the 'Hit()' function. Currently when the object hits the landscape, it makes a RockHit* sound. Let's make it explode instead. ;D
Delete the line containing the Sound function, and write 'Explode(30);' instead:
protected func Hit()
{
	Explode(30);
	return 1;
}
| Script Tip: Notice every line ends with a semi-colon. If a line is not closed, the engine will throw a syntax error! The same goes for brackets, ' { } or ( ) '. |
Also, make sure to modify the header for you object. Add the name, a description, and fill in the author! :]
Test your object!
Now it's time to try out your object in game. Run the game, and start a test scenario. Hit Ctrl+F5 to start Dev-mode, and type this in as a message (replace 'MyObject' with the ID of your object):
| /script GetCursor()->CreateContents(MyObject) |
Your clonk should have the new object appear in his inventory. Throw it on the ground!
Other Fun Example Scripts for your Object
These examples will make you familiar with a few common script functions.
Make it Bounce!
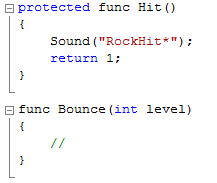
For this example, we'll make a secondary function that the Hit() function will call. While not quite necessary, this is a good way to become familiar with how functions work.
Underneath the Hit function, start a new function called 'Bounce'. The syntax should look as such:

Where the commented line is ( // ), remove that and add this function: 'SetYDir(level);'. Under that line, add a 'return 1;' to end the function. Now let's look back at the Hit() function. Remove the 'Explode()' function there. This time, write in: 'Bounce(-20);'.
Now when the Hit() function is called, it will call the Bounce function, passing '-20' as the 'level' parameter. Test it out in game, see if it works.
Todo: Some more basic tuts
