Building with Linux: Difference between revisions
| Line 23: | Line 23: | ||
== Get Dependencies == | == Get Dependencies == | ||
Like most big programs, OpenClonk doesn't stand on its own. Some things (like opening PNG images) were already programmed by other programers far better than we could ever do. Simply get the following packages: | Like most big programs, OpenClonk doesn't stand on its own. Some things (like opening PNG images) were already programmed by other programers far better than we could ever do. Simply get the following packages (they may have different names on your distribution): | ||
* libsdl2-dev | * libsdl2-dev | ||
* libopenal-dev | * libopenal-dev | ||
Revision as of 10:18, 13 August 2017
Get the sources
To get the sources, you need to clone our git repository. Enter the command
$ git clone git://git.openclonk.org/openclonk.git
OpenClonk team members: Use "ssh://git@git.openclonk.org/openclonk.git" instead.
Congratulations, you now have the bleeding edge of OpenClonk development on your hard drive! There is a lot of stuff and most likely you won't understand much of it. Here's a quick orientation guide of the actually important bits:
- "docs" - the sources of our documentation
- "planet" - these are the game resources - scripts, graphics and everything to explain how to make a game out of them
- "src" - all the source code of the game engine. Lots of C++ ahead.
Get it to Compile
This is nice, but we are interested in seeing the game run, aren't we? For this, we need a program that will take all those C++ files and make an executable file out of it. Unfortunately, programming is complicated stuff so even setting up the tools and the environment has become a bit of science. But this won't stop us.
Get the Compiler Tools
Before you can start building an executable, you will need some more tools:
- make, gcc for building (this may be part of your Linux distribution already)
Get Dependencies
Like most big programs, OpenClonk doesn't stand on its own. Some things (like opening PNG images) were already programmed by other programers far better than we could ever do. Simply get the following packages (they may have different names on your distribution):
- libsdl2-dev
- libopenal-dev
- libminiupnpc-dev
- libgl1-mesa-dev (will most likely be already installed after you got libsdl2-dev)
- libxrandr-dev (will most likely be installed already after you got libsdl2-dev)
- qtbase5-dev
- libfreetype6-dev
- libjpeg-dev
- libglew-dev
Get CMake
Before all this becomes useful, we still need something that tells the compiler how all those sources and libraries should be compiled together.
For this you need a project file. But there is none - we have to consult another program to generate it for us. This might seem confusing - but the point is that there are a lot of build environments, and having all those project files next to each other would become a problem in the long run.
Get the cmake package.
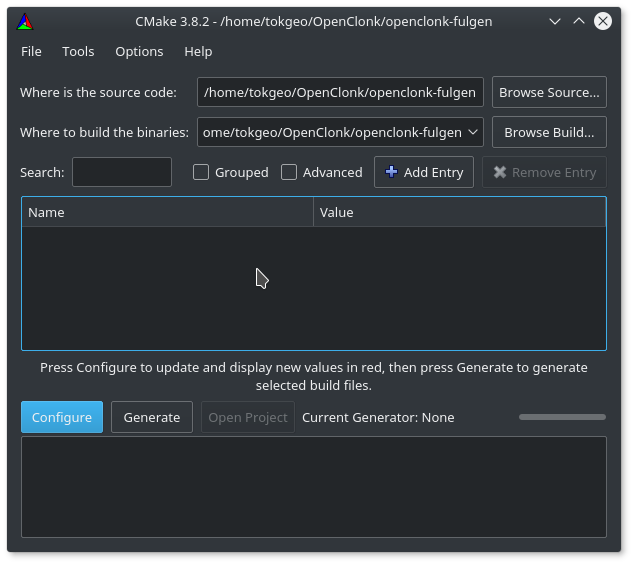
After the installation, start the CMake GUI from the start menu. Put the path you cloned the repository into the source code path field.
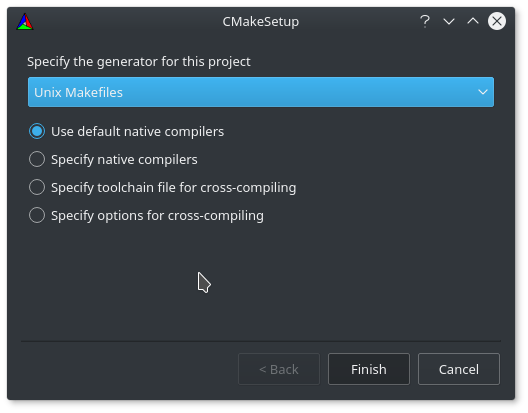
Now click the "Configure" button in the lower left. It will ask what compiler we want to use. Select the compiler you want to use, most likely the "Unix Makefile" will be the one that you need.
If you get some error messages (in red), you're probably missing some dependencies. CMake will tell you which ones are missing, and you just need to install those, too.
Repeat the "Configure" step, until CMake no longer gives you error messages. It may still show you some missing paths, but that shouldn't affect you:
The last step is to click the "Generate" button. If you can click "Generate" and you do not get an error message, you're good.
Your First Build
Okay, now we have everything needed to make OpenClonk run for the first time. Open a terminal in the build directory that you configured in cmake, where the makefiles are located now. Enter the command
make -j$(nproc)
You could simply call make, but it will take a little longer to compile then: Instead, we start $(nproc) parallel jobs, where $(nproc) will be substituted by the amount of threads your processor can handle.
In short
If you prefer doing things on the command line, this is a short alternate path to getting a working build (tested on Ubuntu 16.04, the use of ninja is optional):
- apt install git cmake build-essential libpng-dev libjpeg-dev ninja-build \
 libfreetype6-dev libglew-dev libreadline-dev libsdl2-dev libqt5widgets5 \
 qtbase5-dev libsdl2-mixer-dev libdw-dev
$ git clone git://git.openclonk.org/openclonk && cd openclonk && cmake . -GNinja && ninja openclonk


