Tutorial: Scenario Creation
NOT YET FINISHED
Hello and welcome to this guide on how to create your own scenarios for OpenClonk!
This tutorial will show you how to make maps for OpenClonk. It's up to you if you want to create a settlement scenario, an arena, a parcour or whatever. Here you will learn the basics and then you can visit one of the follow-up tutorials for the type of scenario you would like to make.
I will use the Eclipse C4DT Editor, so if you did not already, follow this guide for installing and setting it up properly.
First Steps
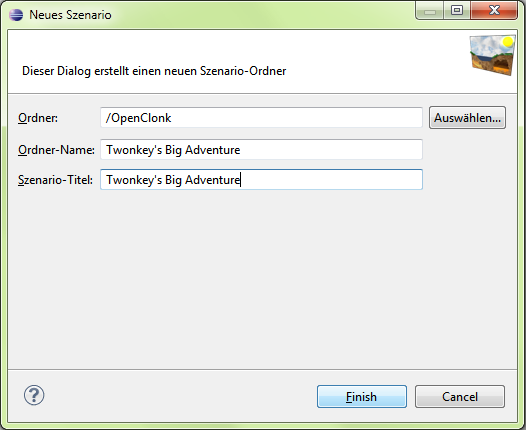
Fire up Eclipse, you should be presented with your OpenClonk project. Right click on it and select New -> Szenario. In the following configuration window, you can specify the directory, the folder name (the name you see inside Eclipse), and the scenario titel itself. I recommend you to keep those two names the same so it doesn't get too confusing.
After hitting the Finish button, your scenario will most likely appear somewhere at the bottom, so press F5 to refresh and it will jump in it's place.
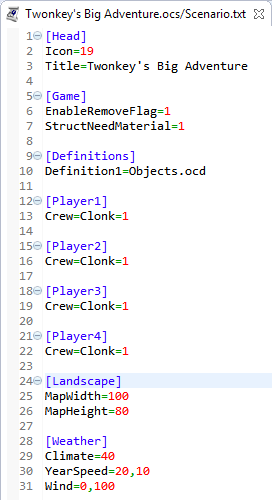
Now expand your newly created scenario by clicking on the little arrow beneath it and open up the file called "Scenario.txt". This file contains information about the scenario that will be executed at startup (more information).
Scroll down to the "[Landscape]" section and delete everything in it except MapWidth and MapHeight. Those two values determine the map size. Changing them after having painted something won't have any effect, so choose them carefully. If you are not sure, think of a scenario which is about the size you would like yours to have and look up it's map size. This is how Scenario.txt looks like in my case:
Save and close the file.
Now we're gonna delete the file "Landscape.txt", it is for dynamic map generation and we want to paint our map manually, so we do not need it.
Starting a Scenario in Editor Mode
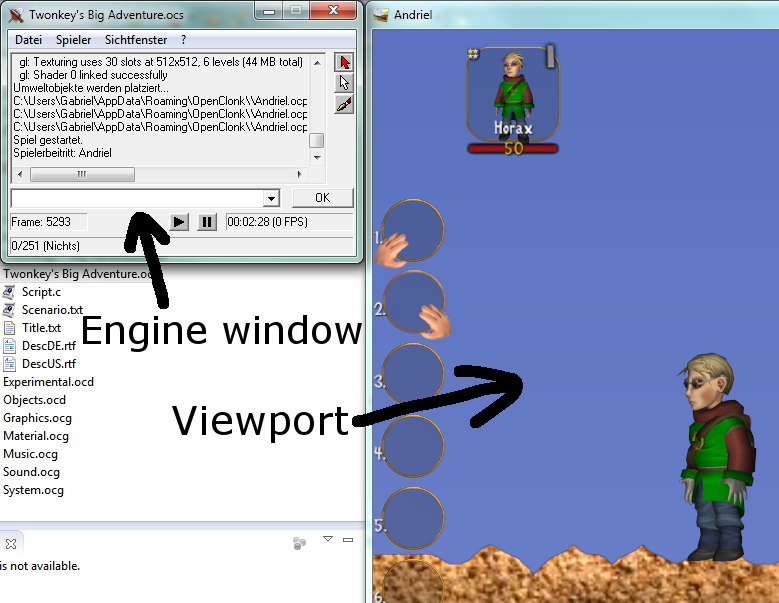
To edit a map, you have to start your scenario in Editor Mode, which gives you access to various editing tools. You can start a scenario with or without players. Unfortunately, it is not possible to toggle players inside Eclipse (yet), so you have to start OpenClonk and (de)activate players in the "Player Selection" dialogue.
When starting without players, the game starts paused and you have to open a viewport yourself via Viewport -> New.I recommend you to start with a player though, because the viewport scrolling bars are broken and you can navigate better with the camera following a clonk.
Either way, to start the scenario, select it and press the little play button in the action bar at the top.
                           | |
                           | |
                           V V
And you will start in a perfectly clean world. Best conditions for creating your masterpiece, so let's get to the fun part! There are various tools available to design a map, they are explained in the next chapter:
Map Editing Tools
(See this page for more details.)
Pause/Resume Buttons: ![]()
As the name suggests, you can pause and resume the game using these. Left and right to them, you can see a frame counter, a real time counter, and the current FPS.
Game Cursor: ![]()
This cursor is the same as the ingame cursor, you can use it to throw objects, shoot arrows, and do all the other mouse control stuff.
Note: You can only zoom with the scrolling wheel when this cursor is selected. Otherwise, you have to use F5/F6.
Editing Cursor: ![]()
With this cursor, you can select objects, drag them around, duplicate them, and delete them. Try selecting your Clonk and drag him around. If there are multiple objects overlapping, you can rightclick and select the one you want in the contextmenu.
When you pick the editing cursor, a properties window appears, and you can see the cursor position coordinates alongside the name of the object currently hovering over in the lower left corner of the engine window. These coordinates are especially important when it comes to determining the starting position or placing objects via script.
You can delete and duplicate objects, and also access their contents, in the right click contextmenu.
Landscape Brush: ![]()
Select this tool, and a little window will appear with all the options greyed out, which says "Dynamic landscape". This means that the map is generated randomly on scenario start based on special Map Generator code. (The Landscape.txt file we deleted, remember?) But since that's a bit more complicated and we just want to paint the map straight away inside the viewport, we're gonna switch to the second option: "Static landscape".
Static landscape means you can paint a map with all the different materials, save the map into a Map.bmp file, and on next startup, you get the same map.
Important: Do not use the third type, "Exact landscape". It generates way too big files and is buggy, so you can loose all your progress.
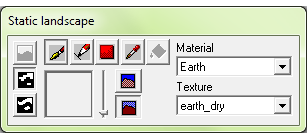
The options in this window are pretty straightforward if you are familiar with an image editor like GIMP. There are different brush types, you can adjust the stroke thickness with the slider, and you can select a material-texture combination. The right texture for each material is chosen automatically, but for some materials, like earth, there are multiple textures available, these are the ones above the hyphen. (You could theoretically also choose a texture from below and e.g. make gold which looks like rock.) Use the different textures to bring more diversity into your maps.
The two buttons right to the slider determine the background appearing when the painted material is dug or blasted free. The lower one is tunnel background, the default, which is fine for most cases. However, you might want it to be sky background in a sky islands scenario for example.
Log:
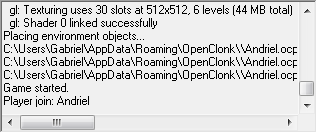
The log is where all the information is displayed, like status messages, errors and executed functions.
Commandline: ![]()
Is used to execute global script commands. You can click the little expand arrow to bring up list of all available functions. (Which are indeed quite a lot.)
Adding Objects: All the original objects are stored inside the Objects.ocd folder. You can add an object to your map by simply dragging the ocd file into the viewport.
Saving:
The engine doesn't save your changes automatically, so save your scenario frequently. Do this by selecting File -> Save scenario in the engine window. The log will say "Scenario saved." and you can quit with peace of mind.
Note: Delete your Clonk before saving, otherwise there will be an "Object XY is missing!" error on startup.
Follow-up Tutorials
Now you can design all sorts of maps, but just a pretty landscape isn't enough - for a complete scenario, you need things like goals, spawnpoints, etc. You will learn how to do this stuff in the follow-up tutorials:
How to create a Settlement Scenario - Not yet available
How to create an Arena Scenario - Not yet available
Those are planned for the near future, but I hope there will be more to come.
Landscape
The landscape - also called map - is a fundamental part of any scenario. After you have finished the concept for your scenario and created the necessary files, creating a landscape is probably your first priority. In OpenClonk there are three ways to create a landscape, these are:
- Dynamic maps using Scenario.txt, which has the drawback of only having stretched and scaled sinusoidal landscapes. This is an obsolete feature and should rather not be used to create landscapes as they are boring.
- Static maps where a drawn landscape is stored in a Map.bmp file, where each pixel represents MapZoom pixels ingame. Check out this tutorial if you want to learn how to draw and save static landscapes.
- Generated maps using a Landscape.txt file where you can create dynamic landscapes using complex algorithms. A lengthy tutorial about the map generator can be found here.
The choice for either a static map or a generated dynamic map depends on the scenario design, adventures rather use static maps opposed to settlement rounds.

