Artists Guide: Difference between revisions
mNo edit summary |
|||
| Line 34: | Line 34: | ||
Exporting a model properly for OpenClonk can be a tricky process, but we've compiled a step-by-step guide on how to do so. | Exporting a model properly for OpenClonk can be a tricky process, but we've compiled a step-by-step guide on how to do so. | ||
'''Installing the Exporter Addon'''[[File:InstallingBlender2OgreAddon.png|200px|thumb|right|Enabling the addon.]] | |||
Download the [http://code.google.com/p/blender2ogre/downloads/list blender2ogre exporter] for your version of Blender. | |||
* | |||
*Put the downloaded file 'io_export_ogreDotScene.py' into your [blender directory]/[version]/scripts/addons folder. | |||
*Load up | *Load up Blender, go to File>User Preferences>Addons>Import-Export and enable the "OGRE Exporter" addon. Then click on "Save User Settings". | ||
You now have the exporter set up. | |||
'''Exporting the Model''' | |||
To export the model, select it (in Object Mode) and go to File>Export>Ogre3D(.scene and .mesh). | |||
To export the model, | Models used for OpenClonk must be exported with specific options: | ||
[[File:ExportSettingsStatic.png|450px|thumb|center|Use these settings for objects without animations.]] | |||
After clicking "Export Ogre", you will be sent back to the 3D View and a Mini-Report will pop up, showing information about the exported mesh and potential errors. | |||
'''Using the Exported Files'''[[File: | '''Using the Exported Files'''[[File:ExportedFilesNew.png|250px|thumb|right|Typical bunch of exported files before user modification.]] | ||
After you have exported the mesh, some files will be created in the chosen directory. You have to convert the ' .mesh.xml' file the exporter has created into the ' .mesh' format, the format used by OpenClonk, using the OgreXmlConverter. | |||
* | Follow these steps: | ||
* | *Obtain the [http://www.ogre3d.org/tikiwiki/OgreXmlConverter OGRE XML Converter software], bundled inside the OGRE Command Line Tools package (look in 'See Also' box for download). | ||
*Extract the OGRE Command Line Tools somewhere easily accessible (ie: C:\OgreCommandLineTools). | |||
*Drag'n'Drop the ' .mesh.xml' file onto OgreXMLConverter.exe | |||
*Delete the ' .mesh.xml' file and the ' .log file' which has been created. | |||
*Make sure the ' .mesh' file is named 'Graphics.mesh' and the ' .material' file is named 'Scene.material'. | |||
*Put 'Graphics.mesh', the 'Scene.material' file, and any textures used by the mesh to your object definition. | |||
| Line 108: | Line 102: | ||
emissive 0.000000 0.000000 0.000000 0.000000 | emissive 0.000000 0.000000 0.000000 0.000000 | ||
...</pre> | ...</pre> | ||
If so, make sure the fourth parameter on ambient, diffuse, specular, and emissive is '1. | If so, make sure the fourth parameter on ambient, diffuse, specular, and emissive is '1.0', not '0.000000' (as shown in the 'material MyCube' example). | ||
By following these steps, you should be able to properly export models for OpenClonk. If you run into any problems, leave a post on the forum addressing the issue. | |||
== Sounds & Music == | == Sounds & Music == | ||
Any game is only half as good without proper sounds and music. If you played the titles of the old Clonk series, you will probably still suffer from the memories of the midi music from the last millenium, like "Pizza strings" or "On a razor blade". Anyway. So we need both people who are good at creating, editing (and searching) sound effects and talented people who can make music for OpenClonk. | Any game is only half as good without proper sounds and music. If you played the titles of the old Clonk series, you will probably still suffer from the memories of the midi music from the last millenium, like "Pizza strings" or "On a razor blade". Anyway. So we need both people who are good at creating, editing (and searching) sound effects and talented people who can make music for OpenClonk. | ||
There are some sound archives out there which have CC-licensed sound effects, also it can't hurt to ask the authors of one of the many many mods for commercial games if we are allowed to use their sounds under the terms of a CC-license (preferably CC-by). | There are some sound archives out there which have CC-licensed sound effects, also it can't hurt to ask the authors of one of the many many mods for commercial games if we are allowed to use their sounds under the terms of a CC-license (preferably CC-by). | ||
Revision as of 09:51, 16 March 2014
There are three main areas where artists can contribute: Modelling 3D objects and the texturing thereof, which requires different skills and doesn't need to be done by the same person. Most of our modellers use Blender, however which modeller you use is not important as long as it can export meshes to the OGRE format. For creating scenario backgrounds, textures for models, scenario decoration and stuff, we actually need people who are good with Photoshop, GIMP or any other image manipulation software. Also, we are in desperate need for people who are talented at creating sounds and/or music.
Have a look in the art workshop.
Modelling
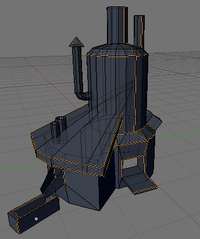
We got rid of the old graphics from Clonk Rage which were so tiny that it was already hard to play the game in a proper resolution. (The character you control smaller than a mouse cursor? Come on!) For OpenClonk, the graphics are about three times as big and detailed as in the old Clonk series.
Unlike in previous clonk titles, most objects are actually models that are rendered in game. The file format we use for this is the OGRE format as it is a format designed to be used in games plus all important modellers can export into this format. However, we do exchange of the models in their native format (mostly .blend).
Now, for creating models that are to be rendered ingame (in OpenClonk), there are a few additional things that have to be considered if you are used to creating models that are rendered before the start of the game. Apart from the polygon count, for each model we only use one UV-mapped texture rather than zillion materials with different colors/googled textures. More guidelines on how to create a real time model for OpenClonk can be read here: Modelling Workflow.
You might ask yourself if there is a guideline of how many polygons a model should max have. Yes, there is one: So many, that the object looks both good ingame with a 3x zoom and on it's picture graphic (whichever is bigger). Also, unanimated inventory items like materials don't need to be rendered ingame. As sprites, the polygon count doesn't matter.
Also, if you want to contribute a model, please always include the 3D-model when you attach a rendering of the same to your post. Otherwise, if you somehow lose your model, all the work was in vain.
Textures
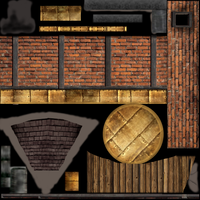
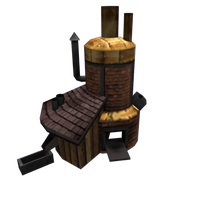
We use the CC-by licence for OpenClonk and ask you to license your contributions under the same license. As many textures in texture archives have licenses which are not compatible with CC-by, we will have to create many textures on our own. But don't worry, it's quite easy and there are some really good tutorials on how to create quality textures from photos.
Here is a list of bigger texture archives and it's licenses which is a good source for resources: Texture Archives
My experience is that textures for 3D-models which are based on actual photos always turn out better then textures which where painted by oneself.
You might also ask yourself if there is a guideline of how big the texture for one 3D-model should be. Right: So big that it doesn't look blurred ingame with a 3x zoom and on it's picture graphic (whichever is bigger).
For material textures, we need seamless textures. Regarding this, there are different methods to create seamless textures from (a set of) photos, here is how I do it: Tutorial: Creating Seamless Textures. For GIMP, there are two filters which can do this automatically: The plugin Texturize and the filter Resynthesise. Both work good with textures with small random patterns like gravel, plaster, sand or ground. However, they don't produce quite as convincing results for bigger regular patterns like (roofing) tiles, bricks, wickerwork, pavements etc. The manual method that I proposed always produces better results and if you are experienced in this, it's a thing of five minutes.
Exporting Meshes
Exporting a model properly for OpenClonk can be a tricky process, but we've compiled a step-by-step guide on how to do so.
Installing the Exporter Addon
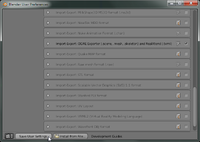
Download the blender2ogre exporter for your version of Blender.
- Put the downloaded file 'io_export_ogreDotScene.py' into your [blender directory]/[version]/scripts/addons folder.
- Load up Blender, go to File>User Preferences>Addons>Import-Export and enable the "OGRE Exporter" addon. Then click on "Save User Settings".
You now have the exporter set up.
Exporting the Model
To export the model, select it (in Object Mode) and go to File>Export>Ogre3D(.scene and .mesh). Models used for OpenClonk must be exported with specific options:
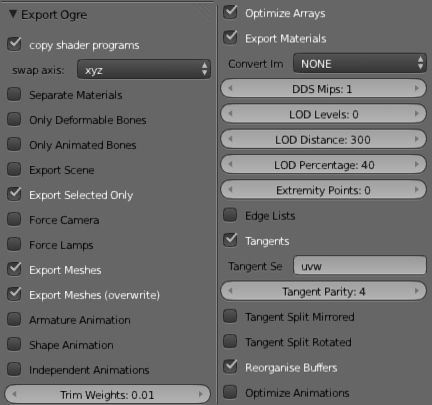
After clicking "Export Ogre", you will be sent back to the 3D View and a Mini-Report will pop up, showing information about the exported mesh and potential errors.
Using the Exported Files

After you have exported the mesh, some files will be created in the chosen directory. You have to convert the ' .mesh.xml' file the exporter has created into the ' .mesh' format, the format used by OpenClonk, using the OgreXmlConverter. Follow these steps:
- Obtain the OGRE XML Converter software, bundled inside the OGRE Command Line Tools package (look in 'See Also' box for download).
- Extract the OGRE Command Line Tools somewhere easily accessible (ie: C:\OgreCommandLineTools).
- Drag'n'Drop the ' .mesh.xml' file onto OgreXMLConverter.exe
- Delete the ' .mesh.xml' file and the ' .log file' which has been created.
- Make sure the ' .mesh' file is named 'Graphics.mesh' and the ' .material' file is named 'Scene.material'.
- Put 'Graphics.mesh', the 'Scene.material' file, and any textures used by the mesh to your object definition.
Scene.material
Scene.material is the file which defines which materials to apply to meshes. Manually modifying Scene.material is crucial to the mesh appearing properly in game. When you export (assuming you are using a texture) your Scene.material file will look more or less like this (don't worry if it looks somewhat different):
material MyCube
{
     receive_shadows on
     technique
     {
          pass
          {
               cull_hardware none
               scene_blend alpha_blend

               ambient 1.0 1.0 1.0 1.0
               diffuse 1.0 1.0 1.0 1.0
               specular 0.0 0.0 0.0 0.0 12.5
               emissive 0.0 0.0 0.0 0.0

               texture_unit
               {
                    texture MyCube.png
                    tex_address_mode wrap
                    filtering trilinear
               }
          }
     }
}
- If 'depth_write off' exists, delete that line.
- If you are using alpha, make sure 'scene_blend alpha_blend' exists (as shown above).
- If your mesh has visible backface(s), make sure to add 'cull_hardware none' (as shown above).
- Depending on the method you used to define alpha in blender, the 'pass' section in Scene.Material may look like this:
pass
{
     ambient 0.500000 0.500000 0.500000 0.000000
     diffuse 0.640000 0.640000 0.640000 0.000000
     specular 0.500000 0.500000 0.500000 0.000000 12.500000
     emissive 0.000000 0.000000 0.000000 0.000000
     ...
If so, make sure the fourth parameter on ambient, diffuse, specular, and emissive is '1.0', not '0.000000' (as shown in the 'material MyCube' example).
By following these steps, you should be able to properly export models for OpenClonk. If you run into any problems, leave a post on the forum addressing the issue.
Sounds & Music
Any game is only half as good without proper sounds and music. If you played the titles of the old Clonk series, you will probably still suffer from the memories of the midi music from the last millenium, like "Pizza strings" or "On a razor blade". Anyway. So we need both people who are good at creating, editing (and searching) sound effects and talented people who can make music for OpenClonk. There are some sound archives out there which have CC-licensed sound effects, also it can't hurt to ask the authors of one of the many many mods for commercial games if we are allowed to use their sounds under the terms of a CC-license (preferably CC-by).
