Building with MinGW
Getting the sources
Just follow the instructions in Building_with_Windows#Get_the_sources.
Getting MinGW
Choose the most recent installer from[sourceforge].
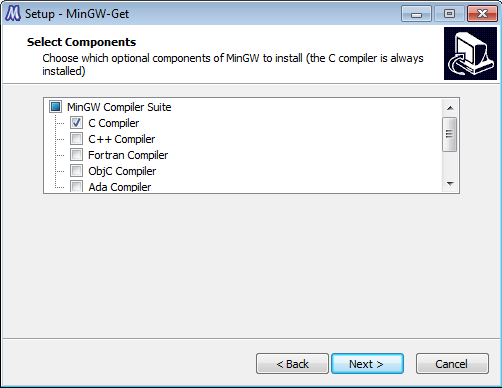
Click Next until you hit the following screen:
Check the boxes "C++ Compiler", "MSYS Basic System" and "MinGW Developer Toolkit". Finish the installation wizard.
Compiling
Getting precompiled dependencies
Download them from [[1]] and extract them to the openclonk folder (that you checked out with tortoisegit).
Getting cmake
Download the win32 installer from [[2]] and click yourself through the installer.
Compiling the source
Run the "MinGW Shell", which can be found under Start->Programs->MinGW.
Now we want to go to the openclonk folder. Since the MinGW Shell kindof simulates a linux shell, you have to use different commands when compared to the windows command prompt. If you checked out openclonk to "C:\Users\MyUser\openclonk" you have to type cd /c/Users/MyUser/openclonk to get to that directory. Do this now.
Since we don't want cmake to mess up our openclonk repository, we'll create an extra build folder where it can do as it pleases. Type "mkdir build" to do that. Now enter that new folder with cd build.
You then tell cmake that you are planning on using mingw and it should create all the necessary files for you: cmake .. -G"MSYS Makefiles". If the result looks like the following image, everything went as planned:
Type make and watch huge amounts of green text pass by. This is a good time for a coffee break.


